网页购物车代码:网页购物车功能实现,从基础到进阶的代码解析
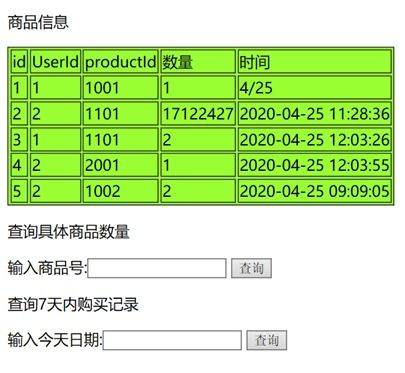
在现代电子商务网站中,购物车功能是提升用户体验和转化率的关键组件,本文将深入探讨如何使用纯前端技术实现一个功能完善的网页购物车,包括添加商品、修改数量、删除商品以及计算总价等核心功能。
购物车功能概述
网页购物车通常包含以下核心功能:
- 商品添加与移除
- 商品数量调整
- 总价计算
- 存储用户选择(本地存储或会话存储)
- 响应式设计适配不同设备
基础实现方案
HTML结构设计
<!DOCTYPE html>
<html lang="zh-CN">
<head>
    <meta charset="UTF-8">
    <meta name="viewport" content="width=device-width, initial-scale=1.0">购物车示例</title>
    <style>
        /* 基础样式 */
        .cart-container {
            width: 80%;
            margin: 0 auto;
        }
        .cart-item {
            border-bottom: 1px solid #ddd;
            padding: 15px 0;
        }
        .item-controls {
            display: flex;
            align-items: center;
        }
        .quantity-control {
            margin: 0 10px;
        }
        .remove-btn {
            background-color: #ff4d4d;
            color: white;
            border: none;
            padding: 5px 10px;
            cursor: pointer;
        }
    </style>
</head>
<body>
    <div class="cart-container">
        <h2>购物车</h2>
        <div id="cart-items">
            <!-- 购物车商品将通过JavaScript动态添加 -->
        </div>
        <div id="cart-total">
            <p>总计: ¥<span id="total-price">0.00</span></p>
        </div>
    </div>
    <script>
        // JavaScript代码将在这里实现
    </script>
</body>
</html>
JavaScript核心代码
// 商品数据模型
const products = [
    { id: 1, name: '商品A', price: 199.99, image: 'https://via.placeholder.com/100' },
    { id: 2, name: '商品B', price: 299.99, image: 'https://via.placeholder.com/100' },
    { id: 3, name: '商品C', price: 399.99, image: 'https://via.placeholder.com/100' }
];
// 购物车状态管理
let cart = JSON.parse(localStorage.getItem('cart')) || [];
// 渲染购物车商品
function renderCart() {
    const cartItemsContainer = document.getElementById('cart-items');
    const totalPriceElement = document.getElementById('total-price');
    // 清空购物车显示区域
    cartItemsContainer.innerHTML = '';
    // 计算总价
    let totalPrice = 0;
    // 遍历购物车中的商品
    cart.forEach((item, index) => {
        const product = products.find(p => p.id === item.id);
        if (product) {
            totalPrice += product.price * item.quantity;
            // 创建商品元素
            const cartItem = document.createElement('div');
            cartItem.className = 'cart-item';
            cartItem.innerHTML = `
                <img src="${product.image}" alt="${product.name}" width="100">
                <div class="item-info">
                    <h3>${product.name}</h3>
                    <p>单价: ¥${product.price.toFixed(2)}</p>
                </div>
                <div class="item-controls">
                    <div class="quantity-control">
                        <button class="decrease-btn" data-id="${product.id}">-</button>
                        <input type="number" value="${item.quantity}" min="1" data-id="${product.id}">
                        <button class="increase-btn" data-id="${product.id}">+</button>
                    </div>
                    <button class="remove-btn" data-id="${product.id}">删除</button>
                </div>
            `;
            cartItemsContainer.appendChild(cartItem);
        }
    });
    // 更新总价显示
    totalPriceElement.textContent = totalPrice.toFixed(2);
    // 添加事件监听器
    document.querySelectorAll('.decrease-btn').forEach(btn => {
        btn.addEventListener('click', decreaseQuantity);
    });
    document.querySelectorAll('.increase-btn').forEach(btn => {
        btn.addEventListener('click', increaseQuantity);
    });
    document.querySelectorAll('.remove-btn').forEach(btn => {
        btn.addEventListener('click', removeItem);
    });
    // 保存到本地存储
    localStorage.setItem('cart', JSON.stringify(cart));
}
// 增加商品数量
function increaseQuantity(e) {
    const id = parseInt(e.target.dataset.id);
    const itemIndex = cart.findIndex(item => item.id === id);
    if (itemIndex !== -1) {
        cart[itemIndex].quantity += 1;
        renderCart();
    }
}
// 减少商品数量
function decreaseQuantity(e) {
    const id = parseInt(e.target.dataset.id);
    const itemIndex = cart.findIndex(item => item.id === id);
    if (itemIndex !== -1) {
        cart[itemIndex].quantity -= 1;
        if (cart[itemIndex].quantity <= 0) {
            cart.splice(itemIndex, 1);
        }
        renderCart();
    }
}
// 删除商品
function removeItem(e) {
    const id = parseInt(e.target.dataset.id);
    cart = cart.filter(item => item.id !== id);
    renderCart();
}
// 添加商品到购物车
function addToCart(productId) {
    const existingItem = cart.find(item => item.id === productId);
    if (existingItem) {
        existingItem.quantity += 1;
    } else {
        const product = products.find(p => p.id === productId);
        if (product) {
            cart.push({
                id: product.id,
                name: product.name,
                price: product.price,
                quantity: 1
            });
        }
    }
    renderCart();
}
// 初始化购物车
function initCart() {
    // 为每个商品添加"加入购物车"按钮事件
    products.forEach(product => {
        const addToCartBtn = document.createElement('button');
        addToCartBtn.textContent = '加入购物车';
        addToCartBtn.addEventListener('click', () => addToCart(product.id));
        // 在商品详情页中,通常会在商品信息后添加此按钮
        // 这里简化处理,直接添加到控制台
        console.log(`为商品${product.name}添加了"加入购物车"按钮`);
    });
    renderCart();
}
// 页面加载完成后初始化购物车
document.addEventListener('DOMContentLoaded', initCart);
进阶功能扩展
使用现代前端框架
对于大型项目,可以使用React、Vue或Angular等框架实现购物车功能:
// Vue.js示例
new Vue({
    el: '#app',
    data: {
        cart: [],
        products: [
            { id: 1, name: '商品A', price: 199.99, image: 'https://via.placeholder.com/100' },
            // 其他商品...
        ]
    },
    methods: {
        addToCart(product) {
            // 添加商品逻辑
        },
        updateQuantity(productId, quantity) {
            // 更新数量逻辑
        },
        removeItem(productId) {
            // 删除商品逻辑
        }
    }
});
添加动画效果
/* 商品添加动画 */
@keyframes fadeIn {
    from { opacity: 0; transform: translateY(20px); }
    to { opacity: 1; transform: translateY(0); }
}
.cart-item {
    animation: fadeIn 0.5s ease-out;
}
实现本地存储
// 在renderCart函数中添加
localStorage.setItem('cart', JSON.stringify(cart));
// 初始化时读取
cart = JSON.parse(localStorage.getItem('cart')) || [];
常见问题与解决方案
跨页面购物车状态同步
- 使用localStorage或sessionStorage
- 实现页面间通信机制
性能优化
- 使用虚拟滚动技术处理大量商品
- 实现懒加载和分页
移动端适配
- 使用响应式设计
- 优化触摸交互体验
网页购物车是电商网站的核心功能之一,通过合理的设计和实现,可以显著提升用户体验和转化率,本文从基础实现到进阶功能,全面解析了购物车功能的开发要点,随着技术的发展,购物车功能也在不断进化,包括与AI推荐系统的集成、增强现实试穿等功能,为用户提供更加智能和便捷的购物体验。
在实际项目中,还需要考虑后端集成、支付接口对接、订单管理等更多功能模块,才能构建完整的电子商务系统。
文章已关闭评论!

